📖 Introduction
Welcome to the Thinkster Learning Platform Admin and Instructor Guide! This comprehensive documentation will help you manage courses, create content, monitor student progress, and utilize all administrative features of the platform.
Admin Roles & Permissions
| Role | Description | Key Permissions |
|---|---|---|
| Super Admin | Platform-wide administrator | Full access to all features, organizations, and settings |
| Organization Admin | Manages a specific organization | Manage courses, users, and settings within organization |
| Instructor | Teaches and manages courses | Create/edit courses, view student progress, grade assignments |
| Author | Creates content and courses | Create and edit course content, lessons, and assessments |
Platform Capabilities
📚 Course Management
Create, organize, and manage comprehensive courses with modules and activities
📝 Content Creation
Build interactive lessons with videos, text, quizzes, and GeoGebra widgets
👥 Student Management
Enroll students, create classes, and monitor individual progress
📊 Analytics & Reports
Track performance metrics, engagement, and learning outcomes
🧪 Assessment Engine
AI-powered adaptive assessments with automatic grading
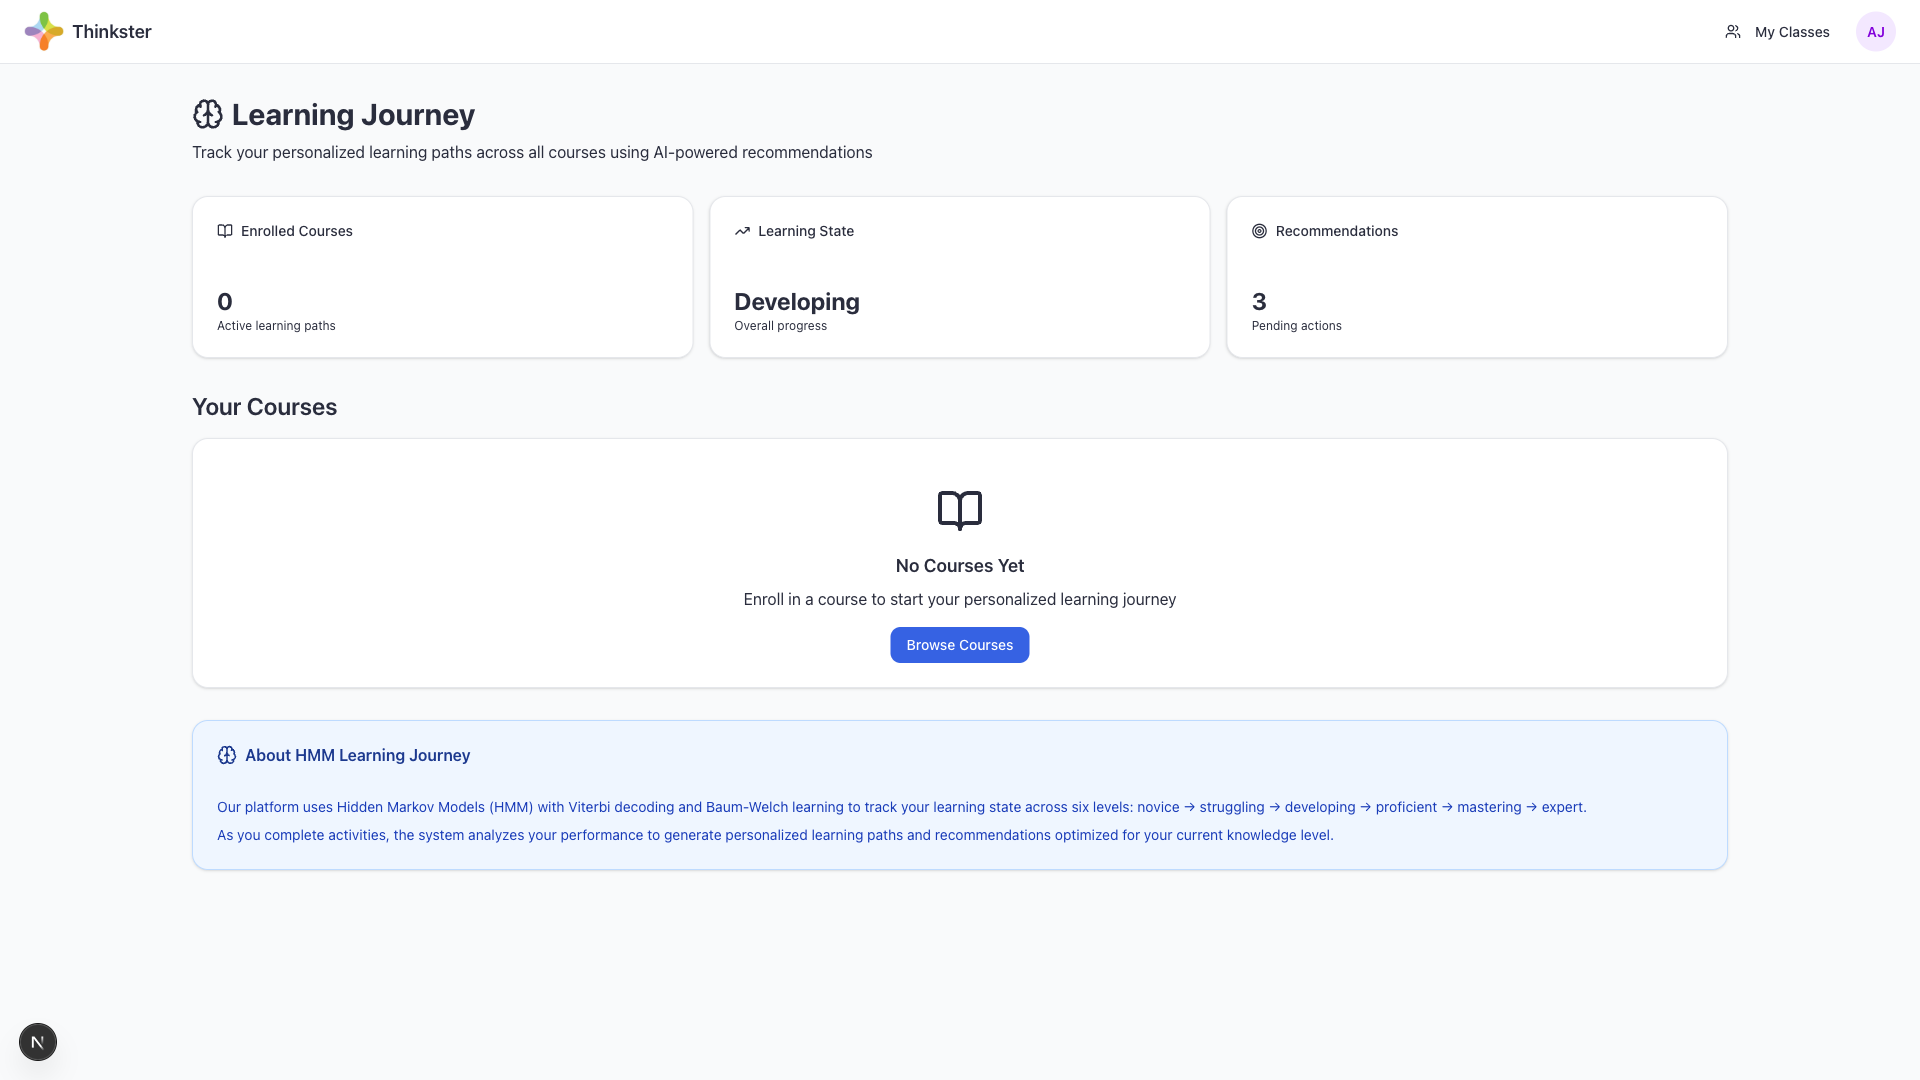
🧠 Learning Journey
HMM-based personalized learning paths and recommendations
🚀 Getting Started
System Requirements
- Browser: Chrome, Firefox, Safari, or Edge (latest versions recommended)
- Internet Connection: Stable broadband connection
- Screen Resolution: Minimum 1280x720, 1920x1080 recommended
- JavaScript: Must be enabled
Before You Begin
Ensure you have:
- Admin credentials provided by your platform administrator
- Access to your registered admin email address
- Understanding of your role and permissions
- List of courses or content you need to manage
🔐 Admin Login
Accessing the Admin Portal
The admin login is separate from the student login to ensure secure access to administrative features.
Step 1: Navigate to Admin Login
Open your web browser and go to the admin login page:
https://your-platform-url.com/admin-auth/login
Or click the "Admin" link on the homepage.
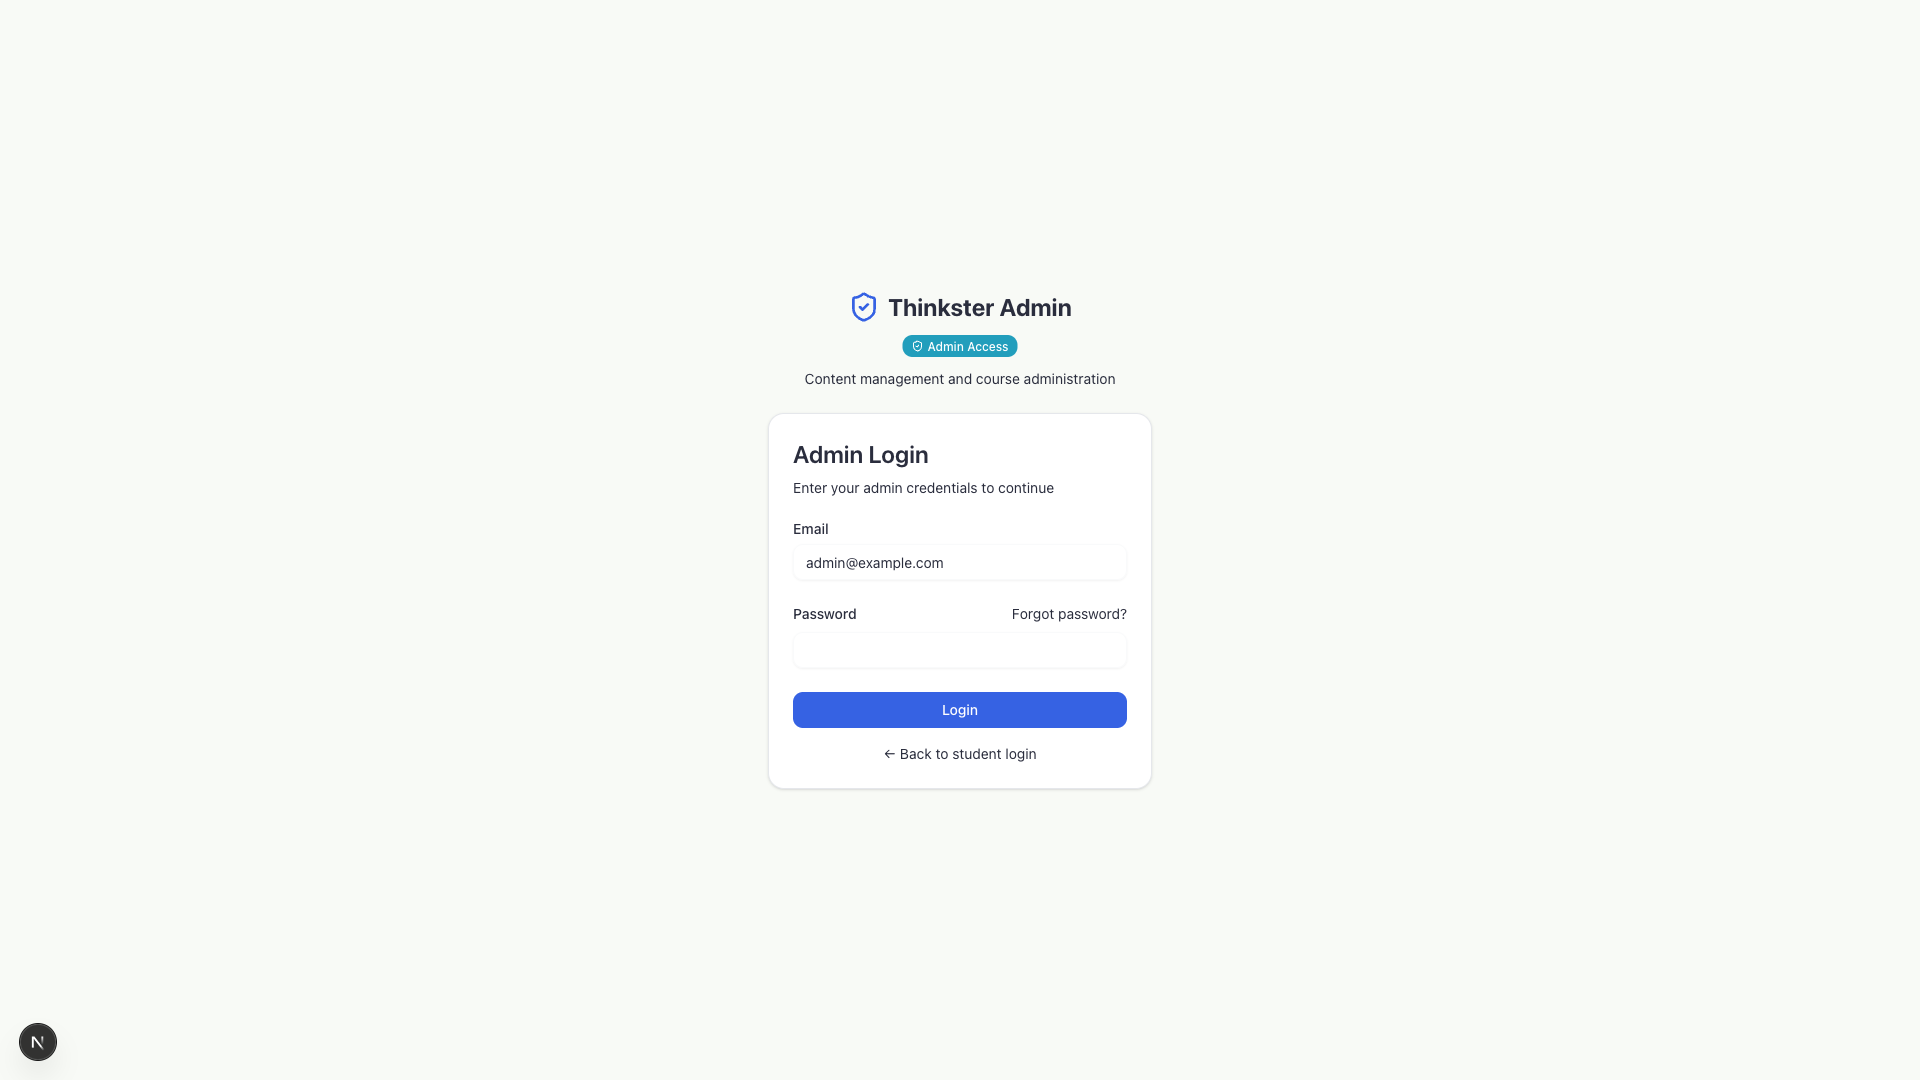
Step 2: Enter Admin Credentials
- In the Email field, enter your admin email address (e.g.,
teacher1@thinkster.test) - In the Password field, enter your secure password
- Click the "Login" button to proceed
Login Process Details
- Email Format: Must be a valid email address registered in the system
- Password Security: Passwords are encrypted and validated securely
- Session Management: Your session remains active for security purposes
- Role-Based Access: Different admin roles see different features
First-Time Login
Initial Setup Steps
- Use the temporary credentials provided by your system administrator
- Log in to the admin portal
- You may be prompted to change your password
- Set a strong password (minimum 8 characters, mix of letters, numbers, symbols)
- Complete any required profile information
- Familiarize yourself with the admin dashboard layout
Password Reset
If You Forgot Your Password:
- Click the "Forgot password?" link on the login page
- Enter your registered admin email address
- Click "Send Reset Link"
- Check your email inbox for the password reset link
- Click the link (valid for 24 hours)
- Enter your new password twice to confirm
- Click "Reset Password"
- Return to the login page and sign in with your new password
- Never share your admin credentials with anyone
- Use a unique, strong password for your admin account
- Log out when using shared computers
- Report any suspicious activity immediately
- After 5 failed login attempts, your account will be temporarily locked for security
Access Navigation
At the bottom of the login screen, you'll see:
- "← Back to student login" - Returns to the student login page
- This allows instructors who are also students to switch between interfaces
Troubleshooting Login Issues
| Problem | Solution |
|---|---|
| Invalid credentials error | Double-check email and password. Ensure Caps Lock is off. Try password reset. |
| Account not found | Verify you're using the correct email. Contact system administrator to confirm admin access. |
| Access denied message | Your account may not have admin permissions. Contact system administrator. |
| Account locked | Wait 15 minutes or contact system administrator to unlock your account. |
| Page won't load | Check internet connection. Clear browser cache. Try incognito mode. |
- Bookmark the admin login page for quick access
- Use a password manager to securely store credentials
- Enable browser auto-fill for faster login (on secure devices only)
- Keep your email account secure as it's used for password recovery
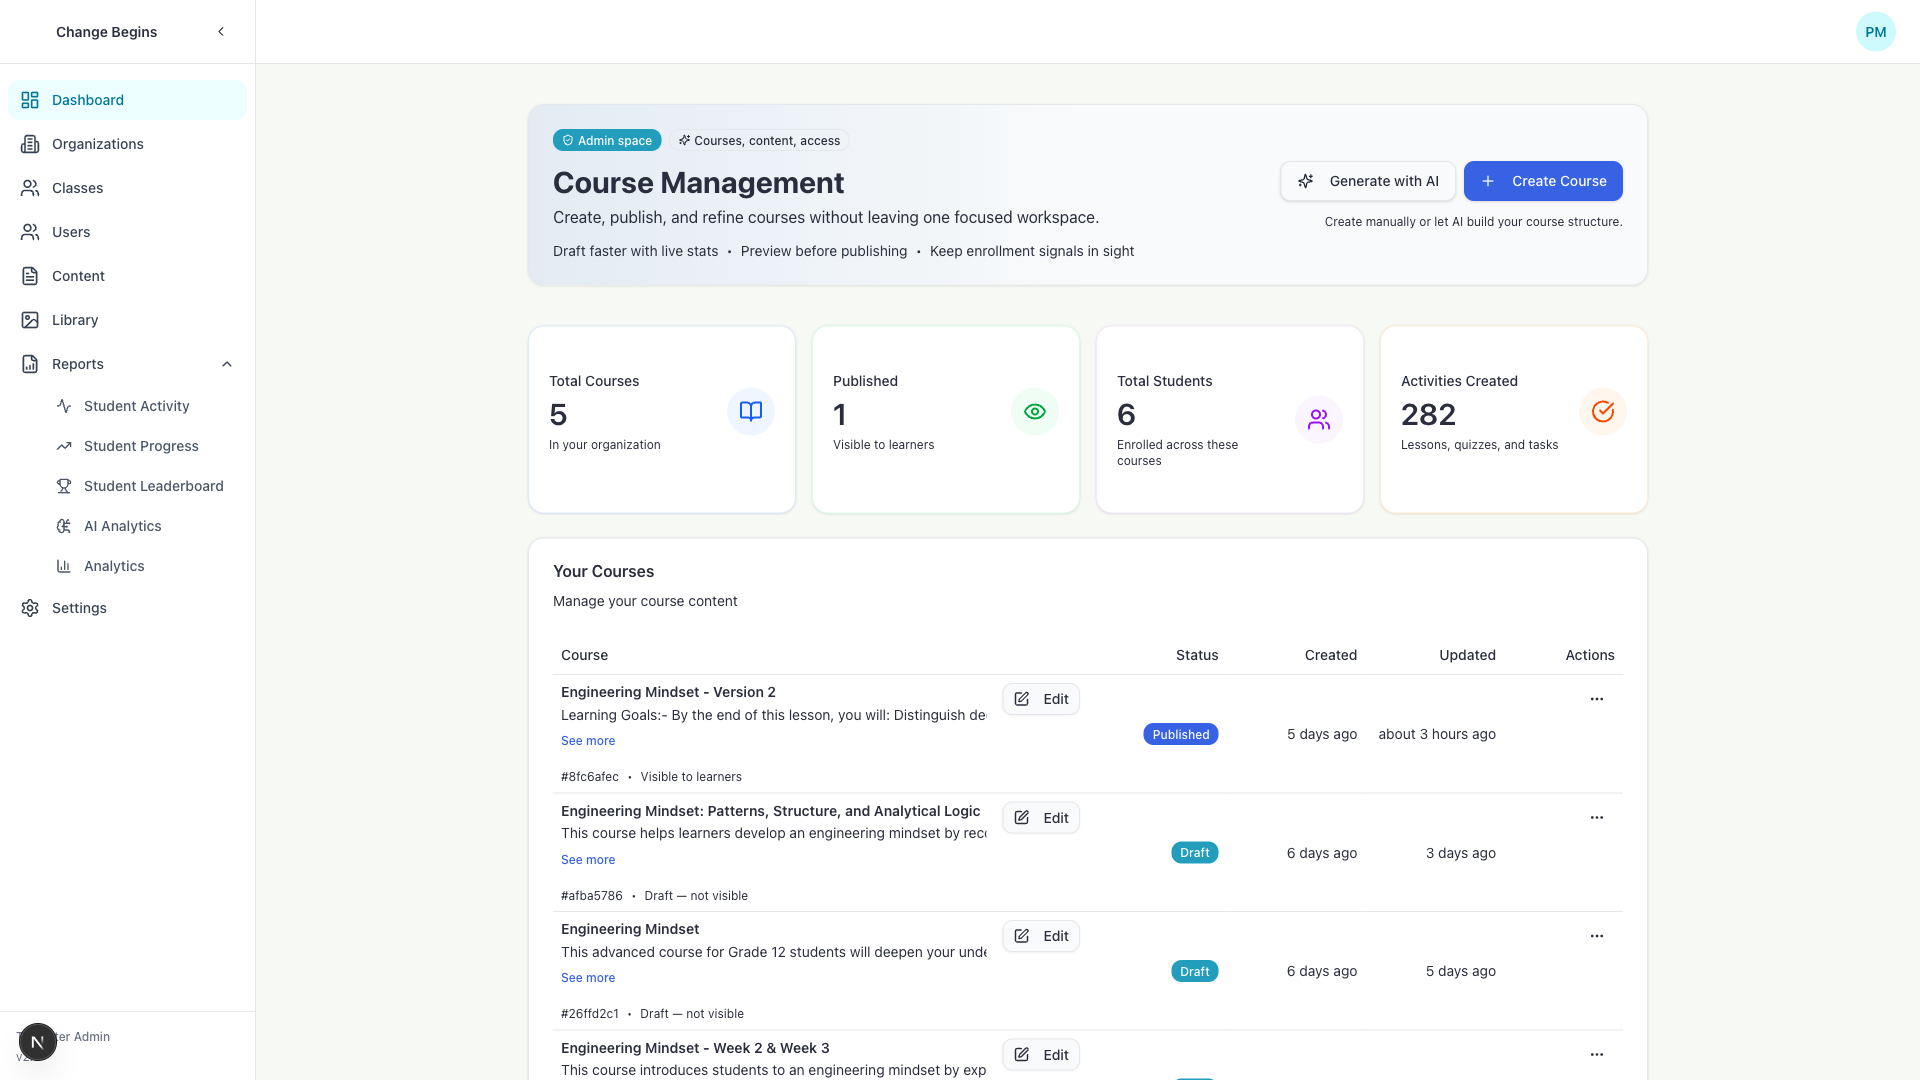
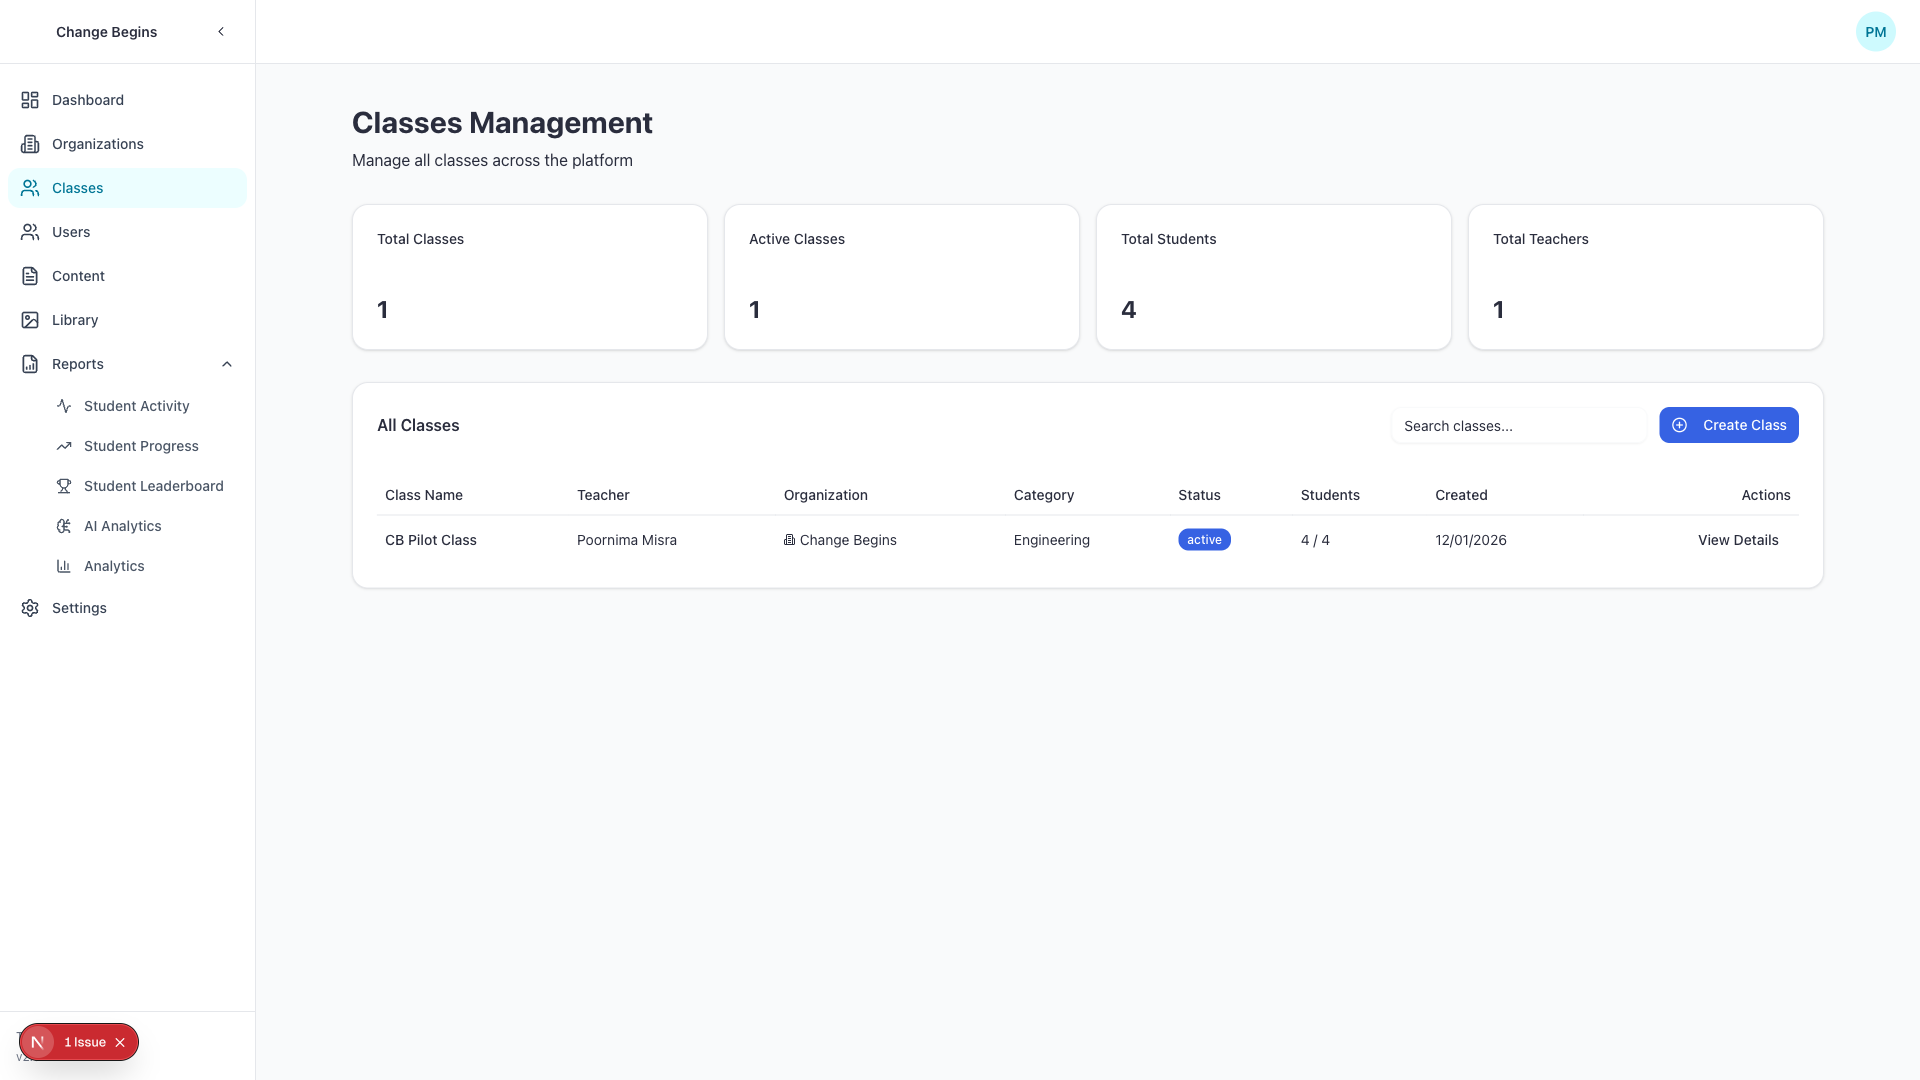
🏠 Admin Dashboard
After successfully logging in, you'll be redirected to the admin dashboard - your control center for managing the learning platform.

Dashboard Layout
The admin dashboard is organized into several key areas:
1. Header Section
- Admin Space Badge: Indicates you're in the administrative area
- Course Management Title: Main heading showing current section
- Action Buttons:
- - Create courses using AI assistance
- - Manually create a new course
2. Admin Stats Cards
Key metrics displayed at the top of the dashboard:
📚 Total Courses
Number of courses you manage
👥 Active Students
Total enrolled students across all courses
✅ Completion Rate
Average course completion percentage
📊 Recent Activity
Student engagement in last 7 days
3. Course Management Table
The main table displays all courses with:
| Column | Description |
|---|---|
| Course Name | Title and brief description of the course |
| Status | Published (live) or Draft (not visible to students) |
| Enrolled Students | Number of students currently enrolled |
| Modules | Number of modules in the course |
| Activities | Total lessons, quizzes, and other activities |
| Last Modified | Date and time of last update |
| Actions | Quick action buttons (Edit, View, Delete, etc.) |
Navigation Sidebar
The left sidebar provides quick access to all admin features:
- 📚 Courses: Main course management (current page)
- 👥 Students: Student enrollment and progress tracking
- 📝 Classes: Organize students into groups
- 🏢 Organizations: Manage organization settings
- 📊 Analytics: View detailed reports and insights
- 🧪 Assessments: Create and manage adaptive tests
- 📖 Content Resources: Manage PDFs and learning materials
- ⚙️ Settings: Configure platform settings
- Use the search bar to quickly find specific courses
- Filter courses by status (Published/Draft) or organization
- Click on any course name to view detailed statistics
- Stats cards update in real-time as students engage with content
Quick Actions
Common Dashboard Tasks:
- Create a New Course: Click "Create Course" button
- Edit Existing Course: Click "Edit" button in course table row
- View Course Details: Click on the course name
- Publish Draft Course: Use the status toggle in the course row
- View Student Progress: Navigate to Students section
📚 Course Management
This section covers creating, organizing, and managing courses on the platform.
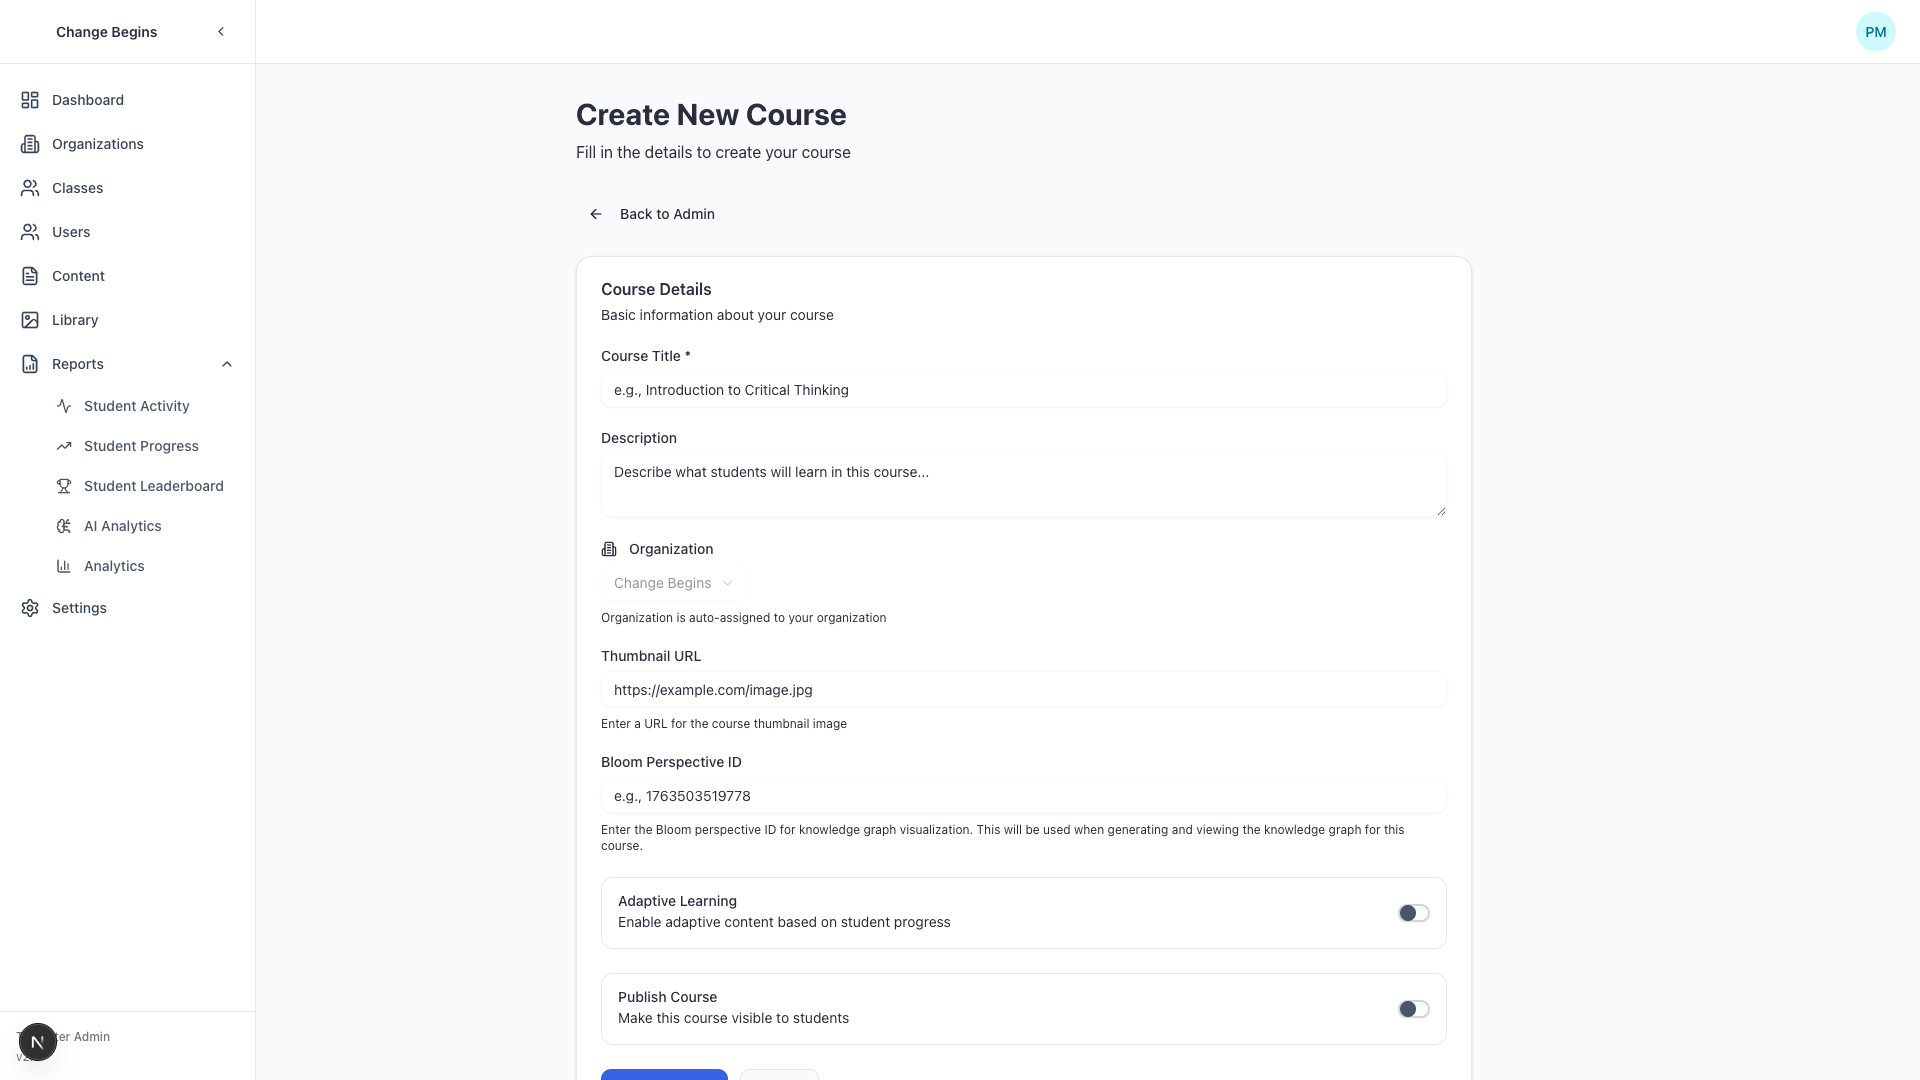
Creating a New Course
Method 1: Manual Course Creation
- From the admin dashboard, click
- Fill in the course details form:
- Course Title: Clear, descriptive name (e.g., "Algebra 1 - Introduction")
- Description: Brief overview of what students will learn
- Grade Level: Target student grade or age group
- Subject: Math, Science, Language Arts, etc.
- Organization: Select which organization owns this course
- Click "Create Course" to save
- The course is created in Draft status (not visible to students)
Method 2: AI-Powered Course Generation
- Click button
- Enter your course requirements:
- Topic/Subject: What the course is about
- Learning Objectives: What students should achieve
- Grade Level/Difficulty: Target audience
- Number of Modules: Suggested course structure
- AI generates a complete course outline with modules and activities
- Review and edit the generated structure
- Click "Create Course" to save
Course Structure
Courses are organized hierarchically:
- Course: Top-level container (e.g., "Algebra 1")
- Modules: Units or chapters within a course (e.g., "Linear Equations")
- Activities: Individual learning items within modules
- 📹 Video Lessons
- 📖 Text Lessons
- ✍️ Quizzes and Assessments
- 🧮 Interactive Activities (GeoGebra)
- 📄 Resources (PDFs, worksheets)
Adding Modules to a Course
Step-by-Step:
- Open your course from the dashboard
- Navigate to the "Modules" tab
- Click
- Enter module details:
- Module Title: Name of the unit
- Description: What this module covers
- Order: Sequence number (auto-increments)
- Click "Save Module"

Adding Activities to Modules
Creating Activities:
- Select a module from your course
- Click
- Choose activity type (Lesson, Quiz, Video, etc.)
- Fill in activity details (see Content Creation section for details)
- Set activity order within the module
- Click "Save Activity"
Course Settings
Configure important course options:
| Setting | Options | Description |
|---|---|---|
| Status | Draft / Published | Draft courses are only visible to admins |
| Visibility | Public / Private | Public courses appear in catalog, Private require enrollment |
| Sequential | Yes / No | Require students to complete activities in order |
| Self-Enrollment | Enabled / Disabled | Allow students to enroll themselves |
| Prerequisites | Select courses | Required courses before enrollment |
Managing Course Content
Reordering Content
- Drag and drop modules to reorder them
- Drag activities within modules to change sequence
- Use arrow buttons for precise ordering
Duplicating Content
To Clone a Course or Module:
- Click the "⋮" menu next to the course/module
- Select "Duplicate"
- Edit the name and settings
- Save the duplicate
Publishing a Course
- Review all content for accuracy
- Test all interactive elements
- Verify quiz questions and answers
- Check that modules are in logical order
- Ensure all required metadata is complete
To Publish a Course:
- Open the course in edit mode
- Go to "Settings" tab
- Change status from "Draft" to "Published"
- Click "Save Changes"
- Course is now visible to enrolled students
- Start with a clear course outline before creating content
- Use consistent naming conventions for modules and activities
- Include a mix of activity types for engagement
- Add estimated time for each activity to help students plan
- Keep courses focused - consider breaking large topics into separate courses
- Use the AI generation as a starting point and customize for your needs
📝 Content Creation
Learn how to create engaging educational content including lessons, quizzes, and interactive activities.
Activity Types Overview
The platform supports multiple types of learning activities:
📹 Video Lessons
Upload or embed video content with automatic progress tracking
📖 Text Lessons
Rich text content with LaTeX math, images, and formatting
✍️ Quizzes
Multiple choice, true/false, short answer, and essay questions
🧮 Interactive Activities
GeoGebra widgets and other interactive learning tools
Creating a Text Lesson
Step-by-Step:
- Navigate to the module where you want to add the lesson
- Click
- Select "Lesson" as the activity type
- Fill in the lesson details:
- Title: Clear, descriptive name
- Type: Select "text" for text-based lesson
- Estimated Time: How long students need
- Use the content editor to create your lesson
- Click "Save"
Content Editor Features
Rich Text Formatting
- Text Styles: Bold, italic, underline, strikethrough
- Headings: H1, H2, H3 for structure
- Lists: Bullet points and numbered lists
- Links: Add hyperlinks to resources
- Code Blocks: Format code snippets
Math Equations (LaTeX)
Add mathematical equations using LaTeX syntax:
- Inline Math: Use
$equation$for inline equations - Display Math: Use
$$equation$$for centered equations - Examples:
- Inline:
$x^2 + y^2 = r^2$ - Display:
$$\frac{-b \pm \sqrt{b^2-4ac}}{2a}$$
- Inline:
Images and Media
Adding Images:
- Click the "Insert Image" button in the editor
- Upload an image file (PNG, JPG, GIF)
- Add alt text for accessibility
- Adjust size and alignment
- Insert into content
Creating Interactive Widgets
GeoGebra Integration
Embed interactive math visualizations:
Adding GeoGebra Widget:
- Create or find your GeoGebra activity on geogebra.org
- Copy the material ID from the URL
- In the lesson editor, add a GeoGebra widget block
- Paste the material ID
- Configure settings:
- Width and height
- Show/hide toolbar
- Enable/disable specific tools
- Preview and save
Creating Quizzes
Manual Quiz Creation:
- Add a new activity and select type "Quiz"
- Configure quiz settings:
- Time Limit: Optional time constraint
- Passing Score: Minimum percentage to pass
- Attempts: Number of retakes allowed
- Show Answers: Display correct answers after submission
- Randomize: Shuffle question and answer order
- Click "Add Question" to start adding questions
Question Types
| Type | Use Case | Auto-Graded |
|---|---|---|
| Multiple Choice | Single correct answer from options | ✅ Yes |
| True/False | Binary choice questions | ✅ Yes |
| Short Answer | Brief text responses | ⚠️ Partial (AI-assisted) |
| Essay | Extended written responses | 🤖 AI Feedback + Manual Review |
| Fill-in-the-Blank | Complete missing words | ✅ Yes |
| Code Challenge | Programming problems | ✅ Yes (test cases) |
Adding a Multiple Choice Question
Step-by-Step:
- Click "Add Question" and select "Multiple Choice"
- Enter the question text (supports LaTeX math)
- Add answer options:
- Type each possible answer
- Mark the correct answer(s)
- Optionally add explanations for each option
- Set question points (default: 1)
- Assign to concepts/topics (for learning analytics)
- Click "Save Question"

AI-Powered Assessment Creation
The platform includes an advanced AI assessment engine:
Creating Adaptive Assessments:
- Navigate to Admin → Assessments
- Click
- Configure template:
- Topic: What the assessment covers
- Objectives: Learning goals to test
- Question Range: Min/max number of questions
- Difficulty Range: Easy to Hard scale
- Click "Generate Questions"
- AI creates questions using Item Response Theory (IRT)
- Review and edit generated questions
- Save and attach to course
Content Standards Alignment
Align your content with educational standards:
- CCSS (Common Core State Standards): Math K-12
- Singapore Math: Primary 1-6
- Map activities to specific standards
- Track student progress against standards
Aligning Content to Standards:
- While editing an activity, go to "Standards" tab
- Click "Add Standard"
- Search for relevant standards
- Select coverage level (Introduced, Reinforced, Mastered)
- Save alignment
Content Best Practices
- Clarity: Use clear, concise language appropriate for grade level
- Structure: Break content into digestible chunks with headings
- Visuals: Include diagrams, images, and interactive elements
- Examples: Provide worked examples before practice problems
- Variety: Mix text, video, and interactive activities
- Assessment: Include formative checks throughout lessons
- Accessibility: Add alt text for images, captions for videos
- Testing: Preview content as a student before publishing
- ✓ Spelling and grammar checked
- ✓ Math equations render correctly
- ✓ All links work and open correctly
- ✓ Images load and have alt text
- ✓ Interactive widgets function properly
- ✓ Quiz answers are correct
- ✓ Content matches learning objectives
- ✓ Standards alignment is accurate
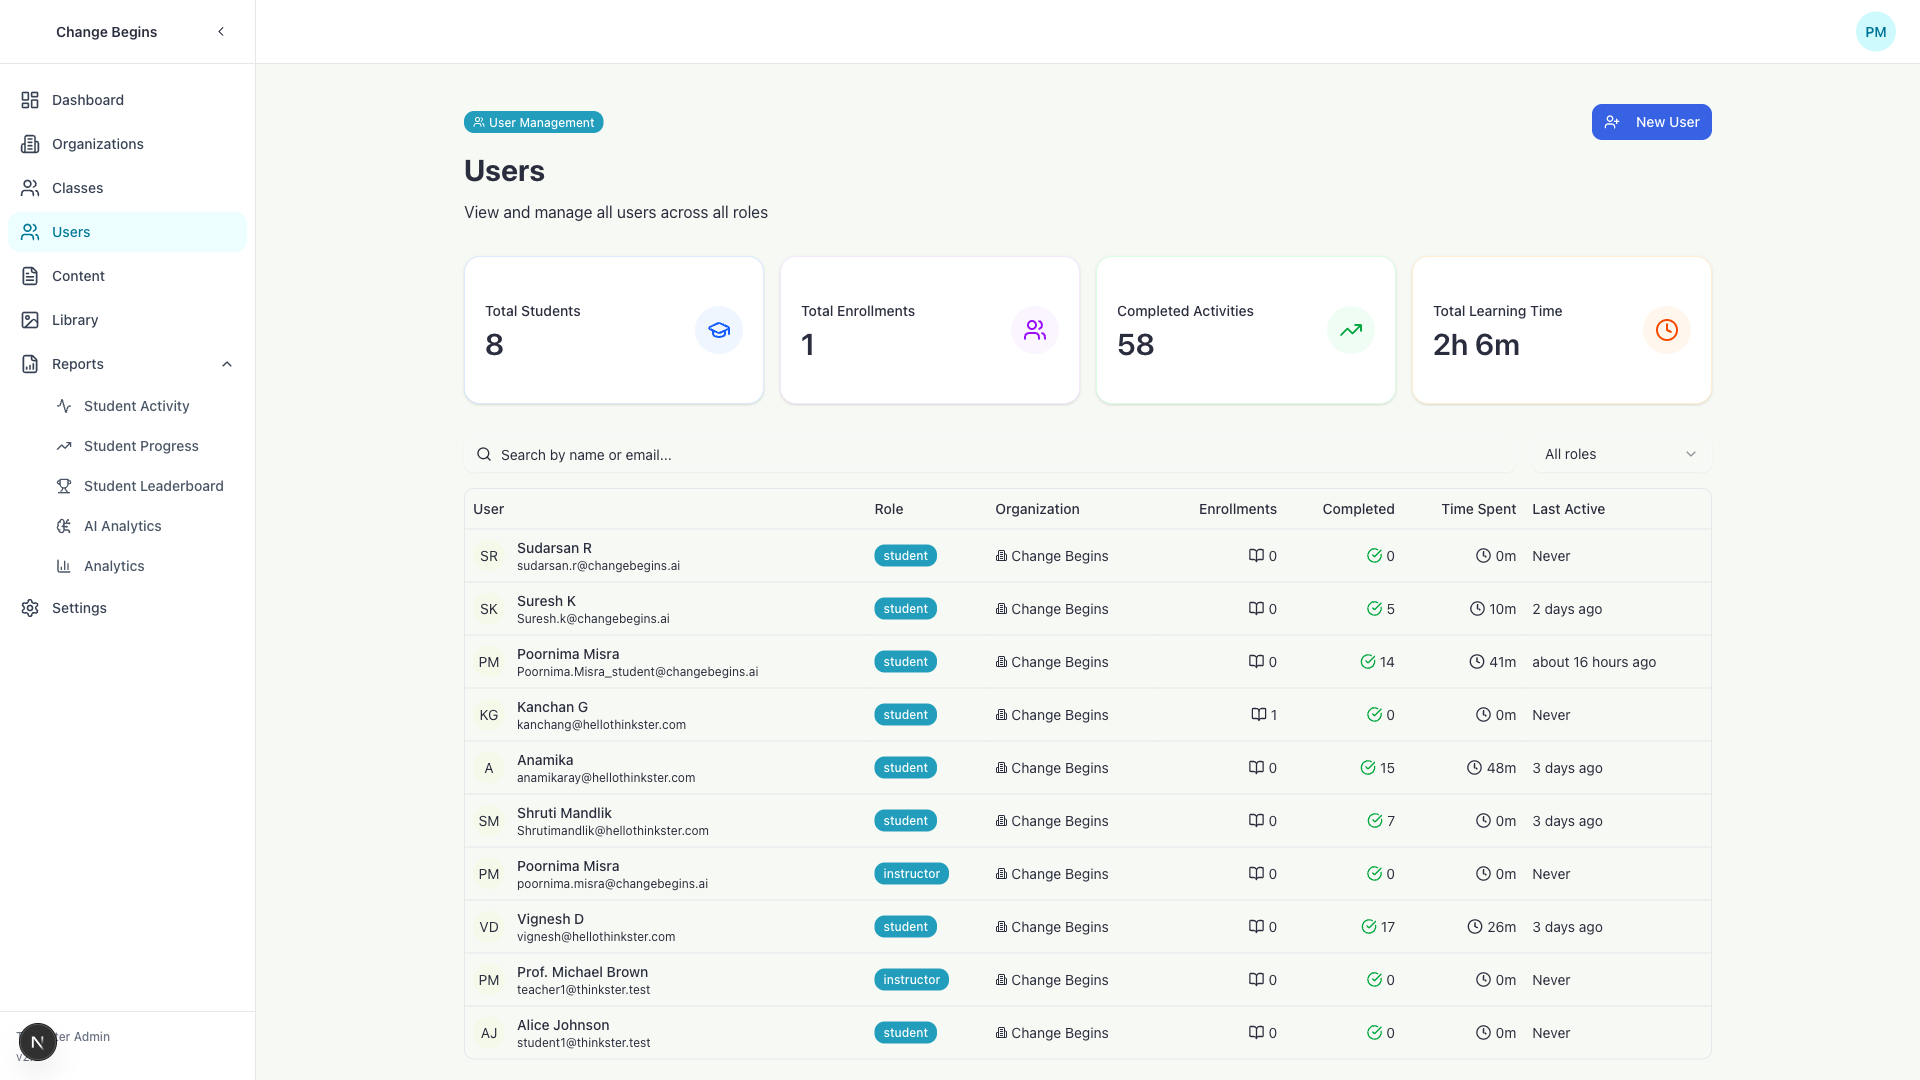
👥 Student Management
Manage student enrollments, track progress, and organize classes.
Viewing Students
Access the students section from the admin sidebar:
- Click "Students" in the left navigation
- View list of all students in your organization
- Use search to find specific students
- Filter by enrollment status, class, or course
Enrolling Students in Courses
Individual Enrollment:
- Go to course details page
- Click "Enrollments" tab
- Click
- Search and select student(s)
- Set enrollment date (default: now)
- Click "Enroll"
Bulk Enrollment:
- Navigate to Students → Bulk Actions
- Click "Import Students"
- Download CSV template
- Fill in student information:
- Email (required)
- Full name
- Course IDs to enroll
- Class assignments
- Upload completed CSV
- Review and confirm
- Students receive welcome emails
Creating and Managing Classes
Classes help organize students into groups (periods, sections, cohorts):
Creating a Class:
- Navigate to Admin → Classes
- Click
- Enter class details:
- Name: e.g., "Period 3 Algebra"
- Code: Unique identifier (e.g., "ALG-P3-2026")
- Grade Level: Target grade
- School Year: Academic year
- Assign courses to the class
- Add students to the class
- Click "Create Class"
Tracking Student Progress
Individual Student View
- Click on a student name from the students list
- View comprehensive dashboard showing:
- Enrolled Courses: All active enrollments
- Completion Rate: Overall progress percentage
- Recent Activity: Last 10 completed activities
- Quiz Scores: Average and trend over time
- Time Spent: Total learning time
- Learning States: HMM-tracked concept mastery
Course-Level Progress
- Open a course from admin dashboard
- Click "Progress" tab
- View class or individual progress:
- Activities completed per student
- Quiz scores and attempts
- Time spent on each module
- Struggling students (flagged automatically)
Reviewing Student Submissions
For quizzes and assignments requiring manual grading:
Grading Workflow:
- Navigate to Admin → Reports → Submissions
- Filter by:
- Course
- Activity
- Student
- Status (pending review, graded)
- Click on a submission to review
- View student's answers
- Read AI-generated feedback (if applicable)
- Add instructor feedback and score
- Click "Save Grade"
Student Actions
| Action | Description | Impact |
|---|---|---|
| Reset Progress | Clear completion status for activities | Student can retake content; scores preserved |
| Unenroll | Remove student from course | Loses access; data preserved for records |
| Extend Deadline | Grant more time for assignments | Individual deadline adjustment |
| Reset Quiz Attempts | Allow additional quiz retakes | Student can attempt quiz again |
| Send Message | Email student directly | One-way notification |
Identifying At-Risk Students
The platform automatically flags students who may need intervention:
- Low Engagement: No activity in 7+ days
- Poor Performance: Quiz average below 60%
- Struggling States: Multiple concepts in "struggling" learning state
- Incomplete Work: Multiple overdue assignments
- Monitor the at-risk student dashboard weekly
- Reach out proactively to struggling students
- Use HMM learning journey data to identify concept gaps
- Recommend specific activities for remediation
- Celebrate progress and achievements
- Encourage consistent daily engagement
🧪 Assessment Management
Create and manage adaptive assessments with AI-powered grading and feedback.
📊 Analytics & Reports
Access detailed analytics about student performance, engagement, and learning outcomes.
⚙️ Organization Settings
Configure organization-specific settings, branding, and preferences.
🔧 Troubleshooting
Common Admin Issues
| Problem | Solution |
|---|---|
| Can't create new course | Check your role permissions. Only instructors and admins can create courses. |
| Student not showing in class | Verify student enrollment. Check class-student associations in student management. |
| Content not saving | Check internet connection. Ensure all required fields are filled. Try again. |
| Assessment not generating questions | Verify OpenAI API is configured. Check assessment template settings. |
Getting Help
- Technical Support: support@thinkster.com
- Documentation: Available in the docs folder
- System Administrator: Contact for platform-level issues
- Response Time: Within 24 hours on business days
❓ Frequently Asked Questions
Access & Permissions
Q: Can I be both an instructor and a student?
A: Yes! You can have both roles. Use the student login for learning and admin login for teaching/management.
Q: How do I grant admin access to another user?
A: Super admins can change user roles in the user management section. Contact your system administrator if you need this done.
Q: What's the difference between instructor and author roles?
A: Instructors can teach courses and view student progress. Authors focus on content creation. Both can create courses and content.
Course Management
Q: Can I reuse content from another course?
A: Yes! Use the course cloning feature or copy individual activities between courses.
Q: How do I make a course private?
A: In course settings, set visibility to "private" and manually enroll students or classes.
Q: Can students see draft content?
A: No. Only published activities are visible to students. Use draft status for content in progress.
Student Management
Q: How do I bulk enroll students?
A: Use the CSV import feature in student management or enroll entire classes at once.
Q: Can I reset a student's progress?
A: Yes, but use with caution. This option is available in student progress management.
Technical Questions
Q: What content formats are supported?
A: Video (MP4), images (PNG, JPG), PDFs, LaTeX math, GeoGebra widgets, and rich text.
Q: Is there a mobile app for admins?
A: The admin portal is web-based and works in mobile browsers. A native app may be available in the future.
Q: How is data backed up?
A: All data is automatically backed up daily. Contact your system administrator for backup policies.